Stone Restoration and Maintenance Corner – More Technical Tips and Tricks
Bob Murrell
M3 Technologies
Photos by Bob Murrell
I know I do these technical tips fairly often, but hopefully they will help someone bypass learning “the hard way.” Maybe I’ll even get a technical tip from a reader that’ll help me going forward, and I’ll pass it along. This article will be a hodge-podge of tips in different areas.
Hand tool work is most always the toughest part of any restoration project. Expensive stand up model edgers are great for commercial concrete work, but nothing gets the job done better than a skilled craftsman and a right-angle polisher. It is the way of the stone restoration contractor, for sure.
So, what can be done to make this daunting task manageable? A roll-around mechanic’s cart certainly helps me in this situation. I am able to roll across the floor with ease and move down the wall and around corners, all while keeping my diamonds and other tooling handy in the tray below. I use a small garden pump-up sprayer for my water distribution. This works very well and will last for awhile before refilling is necessary. For my hand tool of choice, I use both a Makita (which they’re getting very proud of) and a DeWalt. I know the Flex is also a good choice but they are also pricey. Just make sure that the tool is capable of slow speed (will get below 1,000 rpm, and preferably to 800 rpm) and has a 5/8 (inch diameter) – 11 (threads per inch) spindle so that all of the necessary miscellaneous accessories and tools will fit.
Edgework Tips and Tricks
Edgework is very important and should be completed in sequence with the floor machine work. Basically, the edgework, for each grit or step, should be completed prior to overlapping that same grit with the floor machine. Overlapping the floor machine work to the edgework will help to blend the entire floor better. For instance, if you are starting at a 220 grit diamond, do the 220 grit edgework and then overlap with the 220 grit floor machine work. If you completed the edgework after the floor machine work, you could very well end up with an unsightly “picture frame” around the floor. It does get pretty tedious, especially when you’re doing something more complex, like lippage removal. The edgework can make or break the project, so get it right.
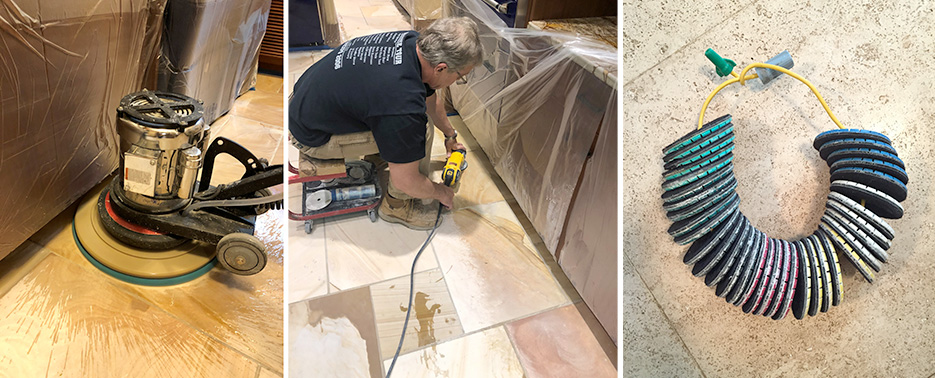
In some edge work operations, the hand tool may be insufficient (even with a 7-inch drive pad) and may not reach under overhangs sufficiently – for example, a cabinet overhang. In this case, I have found using my 20-inch drive plate on my 13 inch floor machine works very well. Just remember, you will probably not be able to use a splash guard, so you will be slinging slurry on the cabinet base. Protect with Tape & Drape as necessary.
 |
|
Above, Left: Using a larger drive plate on a smaller machine helps to get under cabinet overhangs. I use a 20-inch drive plate under a 13-inch M3 machine. Above, Middle: Edge work is the backbone of the stone restoration professional. I use a mechanic’s cart to help make getting around the edges easier.
Above, Right: I keep my diamonds clean and dry after each use. I hang mine up on an electrical cord. This helps them last longer and not deteriorate as fast too. |
 |
|
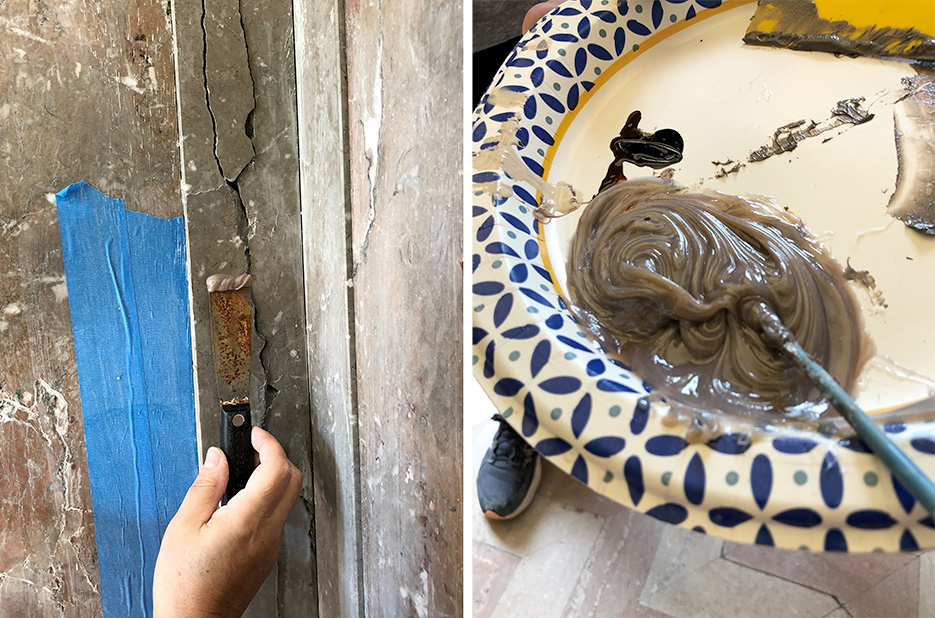
Above, Left: Knifegrade adhesive is great for repairing pieces of stone. Here I am using it on vertical breakage issues that has occurred due to years of settling.
Above, Right: Color your adhesive resin and then use about a 1 inch to 2 inch line of hardener for about 1/2 cup of adhesive. I use a paper plate as a palette. |
Using Polyester Adhesive
When using polyester resins, like Akemi, K-Bond, and others, it is important to get it right the first time. These resins are a two-part (resin and hardener) system. They come in various base colors and consistencies. The most commonly used are the transparent versions in both the flowing (thinner like syrup) and knifegrade (thicker like peanut butter) consistencies. Knifegrade is typically used for repairing two pieces of broken stone back together, whereas flowing is typically used to fill some sort of void.
Both of the transparent adhesives (and any base color) can be colored to match the stone by adding tint to the resin. Coloring tints are available in many different colors. My rule of thumb is to get the resin to the color you want before adding the hardener.
The hardener to resin ratio is about 1 inch to 2 inches of hardener to 1/2 cup of resin. You can vary the amount of hardener to resin, some. Just remember, the faster the resin sets up, the more risk of an adhesive failure. When the hardener and resin are mixed, the chemical reaction creates heat. When something heats up, it expands. When it cools back down, it contracts. And well… you get the picture. It is best to use just enough hardener to get the resin to set up in a relatively slower amount of time, say 15 minutes or so. If your resin is setting up in a couple of minutes, it will get very hot. Use paper plates and plastic knives for mixing to reduce the mess. Spread with the yellow adhesive spatulas.
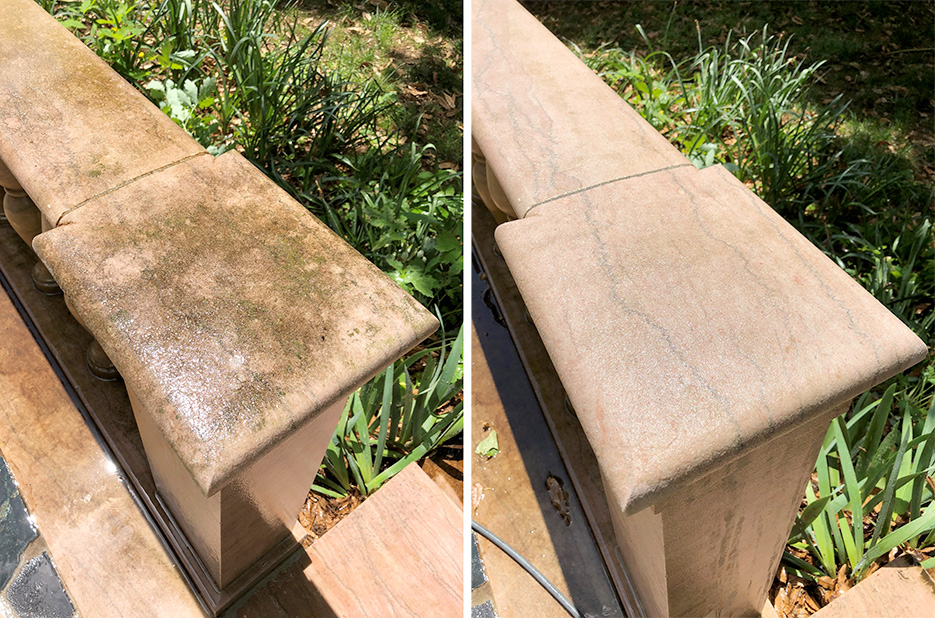
Adjunct services will become necessary when working in stone restoration situations. Take for instance, exterior work. Environmental contaminants can take away from the appearance of many stone installations. A good pressure washer can come in real handy for these projects. We do have to be careful with these pieces of equipment though. The 3,500 psi machine can easily blow out grout, if you’re not careful. A lower psi (say 1,500) machine can also be useful in certain situations where grout or mortar may be questionable. But when it comes to removing environmental staining like mold and mildew, nothing beats the 3,500 psi machine. Once the biological matter has been removed, any restoration and/or honing can take place.
 |
|
Above, Left: Organic contaminants accumulate on exterior stone over time.
Above, Rigt: Careful use of a pressure washer will help remove most contaminants. |
 Caring for Your Diamond Pads
How do you store your diamonds? I use a piece of 12 gauge electrical wire and slide them on, in grit size order, and attach wire nuts on the end. I then hang them up in the van. I most always keep them clean and by hanging them up, they dry quickly, so as not to weaken any adhesives for the Velcro. You probably have your own way to accomplish this, but I thought I would share my way with you. Never throw dirty wet discs in a bin or tote. They will mold and mildew, and the glue holding the Velcro on may loosen and let go.
My biggest tip for you hard-working stone restoration contractors is to enjoy life. For me, it is relaxing on the lake. I love taking family and friends out for a great day on the water. Work hard and play hard too!
I always recommend doing a test area on any project to confirm both the results and procedure. Also, the best way to help ensure success is by partnering with a good distributor, like BB Industries, that knows the business. They can help with technical support, product purchase decisions, logistics, and other pertinent project information.
Bob Murrell has worked in the natural stone industry for over 40 years and is well known for his expertise in natural stone, tile, and decorative concrete restoration and maintenance. He helped develop some of the main products and processes which revolutionized the industry, and is currently the Director of Operations for M3 Technologies.
Send your comments and questions to Bob at attn: publisher@slipperyrockgazette.net .