What is Professional Tile Installation?
Pavlo Starykov
Star Tile and Stone
 Before you answer the question posed in the title, please follow me on a little journey. Join me as I look at a newly installed tiled master bathroom.
As we walk in, we simply stop in astonishment. It’s all Crema Marfil marble, extracted from the mountain of El Coto de Alicante and proudly processed in Spain, installed with different patterns and design configurations. Accent panels are surrounded by bronze liners and inserts. Shower columns are edged with cool trims. 1/16-inch grout lines perfectly line up everywhere. Tile edges don’t have any lippage. Nowhere. They are very flush to each other. Everywhere.
Almost $20k paid just for stone material cost wasn’t spent in vain, right? What should we say? This is a piece of art. A masterpiece. Another marvel of professional tile and stone work proudly installed by a real artisan. Isn’t it?
While such aesthetic standard of evaluating tile & stone work is understandable when it comes to homeowners who have little technical knowledge, a truly professional tile installation contractor must rely upon much deeper criteria. And that is as simple as this: “Is the preparation and installation work done by the industry standards?”
Let’s consider the meaning of the word “professional”.
A quick Google search will most likely give the following definitions:
– Relating to or connected with a profession.
– Engaged in a specified activity as one’s main paid occupation rather than as a pastime.
– A person engaged or qualified in a profession.
It all sounds simple, but let’s not take it lightly. Instead, let’s ask ourselves, “Am I truly qualified (trained) to do my work?”
That’s a very serious question, because a builder who builds a beautiful house without a proper foundation is VERY FAR from being truly qualified! Moreover, a builder who builds a beautiful house without considering what challenges that structure may have to withstand (weather, cataclysms, loads, etc.) is NOT truly qualified!
A properly installed tile or stone provides a permanent finish, but its true quality is deeply influenced by the stability, permanence, and precision of installation of the backing or base materials.
If an individual engaged in the tile & stone installation business considers himself/herself a true professional, would he/she simply ignore continuing education to check where he/she really stands in regards to standards and methods of the industry that had existed long before he/she was even born?
“I have been doing this for 20/30/40 years” may be enough to comfort a naive, trusting customer, but is it really sufficient to be a solid foundation to stand upon for a person who is considered to be a craftsman, an expert, a professional? Come on!
With all that said, let’s come back to our master bathroom. This time I will share with you some disturbing secrets that would be mostly invisible to the untrained naked eye. This time let’s evaluate the preparation work and installation techniques that were applied to build this incredibly expensive “masterpiece”!
 |
|
In this master bath, Crema Marfil was installed over double-layer plywood per industry standards. The floor was flattened to the required plane with a suitable fiber-reinforced, self-leveling underlayment before the stone was installed. All resin-backed stone was primed with a single component primer suitable for wet areas and installed with minimum 95 percent mortar coverage per industry standards. Photo courtesy of Stoneman Construction LLC, Portland, Oregon. |
Problem #1: Lack of proper floor reinforcement
 |
|
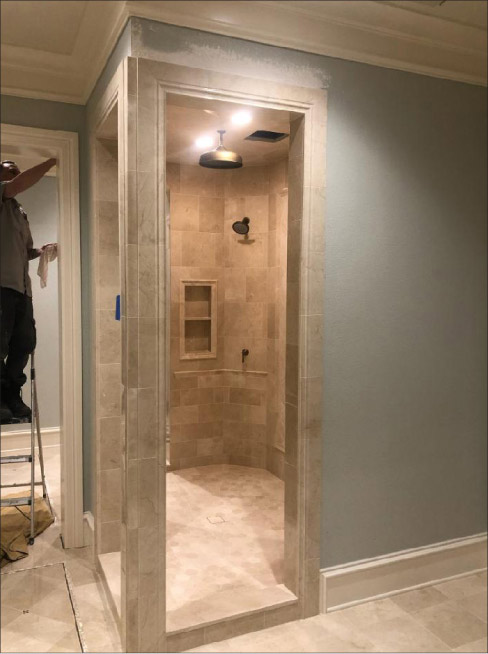
A custom Crema Marfil shower was installed in the same bathroom. All walls and columns had been flattened per industry standards before tile was installed. All resin-backed stone was primed with a single component primer suitable for wet areas and installed with minimum 95 percent mortar coverage per industry standards. Photo courtesy Stoneman Construction LLC, Portland, Oregon. |
Potential risks: stone cracking caused by deflection of the substrate.
All floor tiles were installed over 1/4-inch backer board laid over single layer of plywood with 16-inch on-center joist spacing.
Natural stone tiles do not have the same strength as ceramic tiles and they require a floor system that is twice as stiff as what is required for ceramic floor tile.
Industry standards found in the 2019 TCNA Handbook for Ceramic, Glass, and Stone Tile Installation and the Dimension Stone Design Manual by Natural Stone Institute prohibit installation of stone tile over single-layer wood floor systems under backer board, since the joints between the subfloor panels cannot provide the necessary strength (see 2019 TCNA Handbook, page 30 and Method F250-19 found on page 358 of the same document).
According to Schluter Systems: “Engineering mechanics as well as field observations show that the location of maximum flexural stresses in the floor assembly is directly over the floor joists and at seams in the subfloor panels” (Schluter-Ditra Installation Handbook 2020, page 24).
Therefore, “double-layer wood floors are recommended when installing natural stone, in order to increase the stiffness of the sheathing assembly, and position underlayment seams away from the joists to minimize flexural stresses in the stone covering directly above the joists, and at seams”.
Problem #2: Failure to follow the manufacturer’s instructions in backer board installation
Potential risks: delamination of backer board underlayment from subfloor, cracked grout and stone.
Backer board wasn’t installed by manufacturer’s directions found in the product Technical data Sheet (TDS). No mortar bedding was applied to establish a supporting plane and eliminate voids. Drywall screws were used instead of the screws approved by the backer board manufacturer, non-corrosive exterior grade screws or electrogalvanized nails. Screws were over drilled by 1/8-inch. They were fastened every foot instead of every 8 inches, as the manufacturer requires. No minimum 1/8-inch gap between panels for movement accommodation.
Problem #3: Lack of substrate flattening
Potential risks: insufficient mortar contact between stone and substrate, shrinkage of thin-set mortar due to excessive thickness, cracking stone, hollow sound when walking.
There was NO pre-tiling preparation of substrate to achieve required flatness for natural stone (maximum allowable variation is 1/8-inch in 10 feet from the required plane, with no more than 1/16-inch variation in 24 inches, when measured from the high points in the surface).
A significant area of the floor “read” at least 3/8-inch to 1/2-inch variation within 10 feet, and the largest wall in the shower had 3/4-inch variation when measured from one edge of a 4-foot level to another.
The installer made the finished work look flat and true, but the absence of substrate preparation work caused insufficient mortar coverage to prevent cracks in the stone resulting from voids in the setting bed. In dry and wet areas, the minimum coverage for natural stone is 95 percent with no voids exceeding 2 square inches and no voids within 2” of tile corners (2019 TCNA Handbook for Ceramic, Glass and Stone Tile Installation, page 35).
 |
|
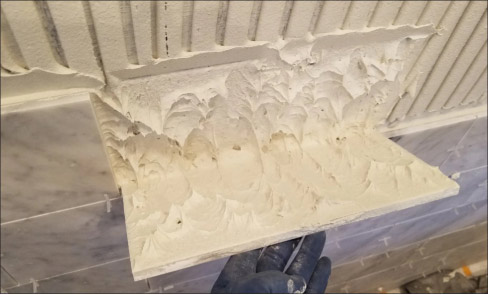
Natural stone must always be installed with minimum 95 percent mortar coverage. Photo courtesy of Star Tile & Stone LLC, Portland, Oregon. |
Problem #4: Lack of bond between mortar and stone
Potential risks: de-bonding of stone when the interface of the tile has separated from its setting bed, tiles falling off walls and ceiling, cracked tiles.
The stone was installed without considering that it has resin-backing (fiberglass mesh adhered to the back of stone with either polyester or epoxy). Such coating is used to reinforce unstable stone slabs and tile to reduce the likelihood of fracture. The main complication arising from this method is that the ability of most (if not all) modified/unmodified mortars (that are mostly Portland-cement based) is severely compromised because the resin forms a non-absorbent coating on the back of the tile that regular thin-set mortar will not properly bond to (even with presence of coarse sand in the backing).
Not long ago the only mortar that would properly bond to resin-backed stone was epoxy but in recent years, after the introduction of new primers specifically designed for non-porous substrates, installers can choose between a wide range of adhesives to install such tile.
Problem #5: Failure to understand how to install natural stone in wet areas
Potential risks: stone moisture discoloration due to lack of proper water evacuation and moisture management.
The marble shower floor was prepared and set in the same manner as porcelain or ceramic tile without deep consideration about how carefully and even uniquely light marble must be installed in wet areas to avoid blotchy moisture discoloration.
Problem #6: Lack of providing movement accommodation
Potential risks: continuous cracks in stone assembly caused by stress and lack of soft joints in changes of plane, stone tenting when tiles start lifting, forming an upside-down V or a tent shape.
The entire tile assembly doesn’t have adequate movement accommodation due to the lack of properly prepared and installed soft/movement joints around the perimeter, and in the changes of plane. All such joints weren’t free of “debris,” but were partially filled with dried thin-set and grout before caulking. A cheap siliconized acrylic caulk was used instead of 100 percent silicone sealant corresponding with the grout color.
Some tiles in the backsplash were installed directly over exposed wall board seams that were not taped with an alkali-resistant or crack-isolation mesh.
As you can see, after investigating the foundation of such a royal- looking Crema Marfil bathroom, we have detected some very serious technical errors. Looking like a real masterpiece upon the completion of work, it would eventually turn into a tremendously expensive and sad failure.
Such a story is not just a fantasy made by an exaggerating imagination. Similar failures that result from ignoring the industry standards seem to happen more and more often. Good intentions and love of tile aren’t enough when it comes to technical knowledge that you can only get through serious education.
I am not saying this as an arrogant, self-proclaimed “expert” who is trying to “bash” the hard-working installers. I once have been in the same spot when I had good intentions, love of tile, great looking finished tile & stone work but I seriously lacked real understanding of standards and proper methods.
Had I done such a project back then, it would have failed, sooner or later, resulting in tremendous problems for the homeowners and most likely casting me out of business with a ruined reputation.
My Message to Tile and Stone Installers
“Don’t follow such a path!”
For me personally, the life-changing experience was to meet active members of the National Tile Contractors Association (NTCA), to become an NTCA member, then to become a Certified Tile Installer (CTI) through the Ceramic Tile Education Foundation (CTEF), then to attend Stone & Tile Inspection class by Fred Hueston (also known as The Stone & Tile Troubleshooting Seminar), and so on.
With so many trade associations, classes, courses, workshops, seminars, and online resources available today we, as tile & stone professionals, have no excuse if we don’t try to become true experts in our trade.
If you are a stranger to the tile and stone industry standards today, don’t hesitate to take steps toward education and research. You are more than welcome to do so! There is room for you! Please come in, stay in and invite others!
Pavlo (a.k.a. Pasha) Starykov is owner of Star Tile & Stone LLC, a certified stone and tile inspector, a certified tile installer (CTI #1480), and NTCA Region 9 State Ambassador. Contact the author at pavlo@startile.us with questions.