Stone Restoration and Maintenance Corner: The Importance of Surface Prep
Bob Murrell
M3 Technologies
Photos by Bob Murrell
 |
|
Above: The initial step in surface prep is often carpet removal. Tile removal is in progress, and surface grinding with a coarse grit will be necessary to remove the dried adhesive and thinset. |
 |
|
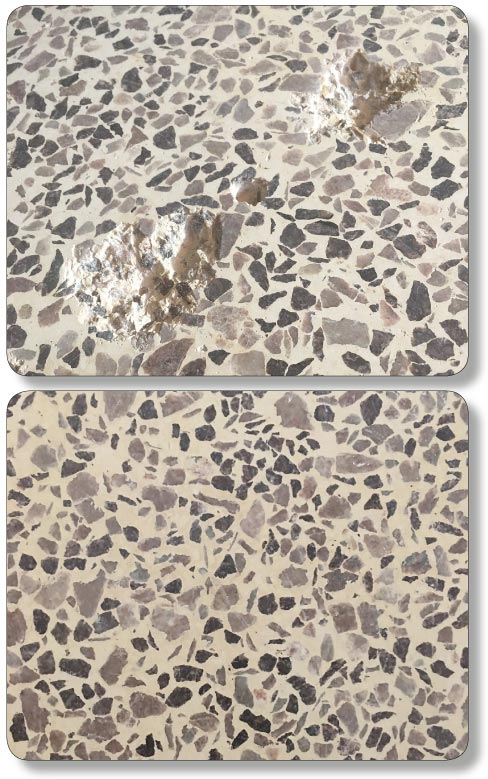
Above: Before and After: Top— Damage from tack strip removal. Blowouts cannot always be avoided, but most damage can be repaired. |
 |
|
Above: Sometimes surface prep takes a hammer and chisel to strategically remove tile and thinset at a new transition point. A power chisel would really help this tedious job go faster! A Schluter strip or T-joint will be installed to finish off the transition between surfaces. |
 |
|
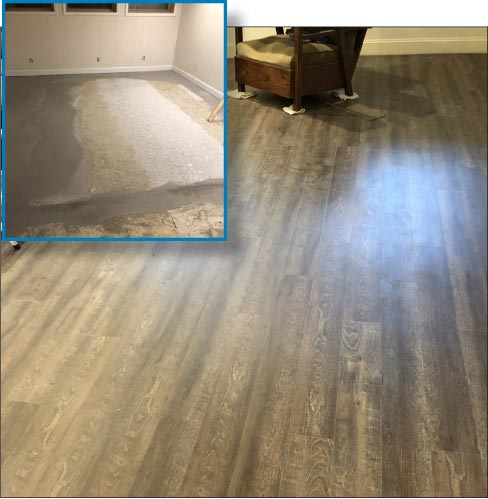
Above, Inset: A self-leveling compound was used to smooth a dip between two concrete sub-flooring slabs. Above: We chose to install wood grain snap-lock planks, but the final surface material could just as easily be ceramic tile or another other hard surface. With thorough surface prep, the only limitation is your client’s budget! |
You have probably heard the term surface prep used before. Surface preparation is normally associated with the removal of one surface product from concrete or similar surface, to prepare for the application of another.
There may be other applications included in this category, but removal of an existing product and then surface profiling the concrete slab for the next product application is the most common.
Of course, typical products to be removed from a slab will vary from one project to the next.
There are many possible operations, such as removing failing epoxies or urethanes, paints, cutback, carpet and the associated adhesives, old VCT (asbestos tile removal is a specific specialty service), old tile and thinset, along with others.
You will encounter epoxy and urethane coatings in many industrial warehouses and manufacturing plants.
These types of coatings are normally selected because of their durability and resistance to chemicals.
Removal of these types of coatings must usually take place during scheduled plant maintenance /outage times, which normally equates to weekends and holidays.
When removing these coatings, the surface is left with a profile which is ready to accept the new coating of choice.
Unlike polishing and other decorative finishes, surface prep work is usually left at somewhat of a rough profile — no more than a 100 grit metal-bond diamond finish, for example. This profile gives the new coating an ample surface area to adhere to.
Most professional surface prep contractors use the big 3 phase 220v – 480v planetary machines or shot blast machines for these industrial projects. When using the planetary machines, coarse grit diamonds, PCD or tungsten scrapers or scarifiers, and bush hammers are fairly common for surface removal.
Most of these projects are done dry. The grinding or shot-blasting machines are coupled with dust extractors so that the operation is very controlled and basically dust-free, or at least the airborne particles are kept to a minimum.
The biggest issues are edges and detail work around machines and shelving. Also, old, hardened metal studs in the floor can wreak havoc on the equipment and tooling if they are accidentally run over.
Another type of surface prep is the removal of carpet and the associated adhesive and ceramic tile removal, both of which I am currently doing at home. We had carpet in the den combined with porcelain tile which bordered the fireplace and on down the hall to the laundry room. We have teenagers and dogs. Dogs and carpet are not necessarily compatible, if you know what I mean. Oh, and let’s not forget the teenagers!
So the “boss” wants the luxury vinyl tile snap-in-place simulated wood planks, which do look rather nice.
I would have preferred the simulated wood porcelain planks, but we are on a budget and those can be rather expensive. In any case, we removed the carpet, chipped up the tile, and then had to remove the carpet adhesive and thinset.
I do have an old 500 planetary machine but we opted to use a single disc machine rather than dig out the big one from the back of the garage and hook up to the 220v power.
Planetary machines are much more productive than single disc machines for surface prep, but this was only about 400 square feet of total area. We weren’t removing all of the porcelain tile, leaving it intact in the hall and laundry room areas.
We do have extra tiles so that we can make a new transition line where the LVCT and porcelain meet. We will have to make new cuts and install either a Schluter strip profile system or a T-mold for the transition.
Another issue encountered is removing all of the thinset from the edges (borders), because as you know, the floor machine only gets so close. This was accomplished with a hand chisel and mini sledge, and definitely was hard work, for sure! So, if you have access to a power chisel, I would advise using that.
Once all of the existing surface materials were removed, we had another issue to deal with. Part of our concrete slab was not flat, and it was actually two slabs with a shallow trough in between.
We had to use self-leveling mix to bring the floor within a specified tolerance to use the snap-together planks, which were four feet in length.
This was a learning experience in and of itself. The viscosity has to be just right to flow properly and therefore fill the low areas. We had to use more water than the directions required to achieve the desired liquidity.
It seemed to produce the desired effect though, and we will begin installing the floor soon. I’ll present project completion pictures at a later date.
I have done several residential and commercial projects where carpet was removed from terrazzo. The stain removal of the adhesive can be a hit or miss. Sometimes you win, and sometimes you just can’t get it all out.
Tack strip removal is another issue, altogether. Usually when you arrive to the project, the carpet has already been removed and the tack strips have been pried off with a crow bar or similar tool.
Unfortunately, this often causes blowout where every nail was holding down the tack strip. This can be quite a bit of work to match (with both the resin and the chips) and fill these holes. Sometimes, the holes may even need to be drilled out for easier filling.
To lessen the blowout, the nails in the tack strips should be gently cut with a sawzsall-type tool or a thin, flexible cutoff wheel on a grinder or Dremel tool. Then simply smooth (grind) out what’s left of the nail. It will be barely noticeable after all is said and done.
So when you hear the term “surface prep,” that is exactly what it means — to prep the surface for the next application.
As always, I recommend submitting a test area to confirm the results and the procedure prior to starting a stone or hard surface restoration or maintenance project.
Also the best way to help ensure success is by partnering with a good distributor that knows the business. They can help with technical support, product purchase decisions, logistics, and other pertinent project information.
Bob Murrell has worked in the natural stone industry for over 40 years and is well known for his expertise in natural stone, tile and decorative concrete restoration and maintenance. He helped develop some of the main products and processes which revolutionized the industry, and is currently the Director of Operations for M3 Technologies.