Stone Restoration and Maintenance Corner: Fixing a Terrazzo Nightmare
Bob Murrell
M3 Technologies
Photos by Bob Murrell
The winter has been very mild this year in the south. It has made winter restoration projects much easier!
 |
|
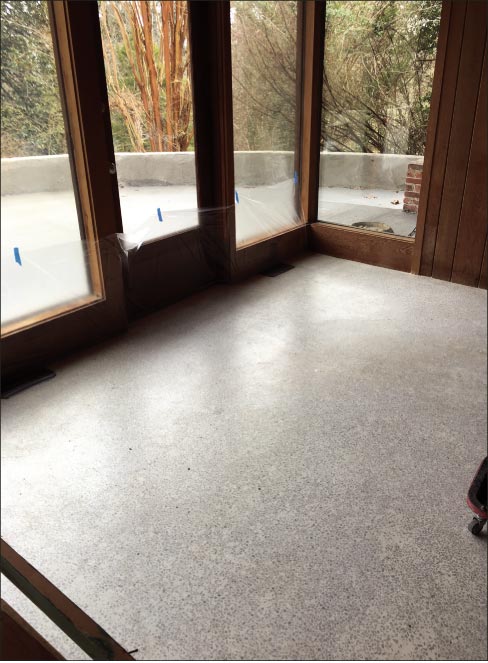
Above: This terrazzo floor is installed in a very nice, mid-century modern house built in the 1950s, but it has seen some hard use, and is covered wall-to-wall with waves, divots, gouges and scratches. My diagnosis? Grind, hone and repolish to restore. |
 |
|
Above: Draped and taped, ready for grinding and honing. We started with smoothing the scratches around the edges, using a 50 grit flexible metal bond wheel. |
However, one of my recent restorations was a terrazzo project which started from a very bad pour, and got worse from there. Grinding waves, divots, and cup wheel gouges were the norm. The customer just wanted the color and some shine so that they could even tell it was a terrazzo floor.
This terrazzo job was in a historical house, built in the 1950s in the Oak Ridge, Tennessee area. I consulted on the project and pitched in where I could. Basically, it was a pitiful looking floor.
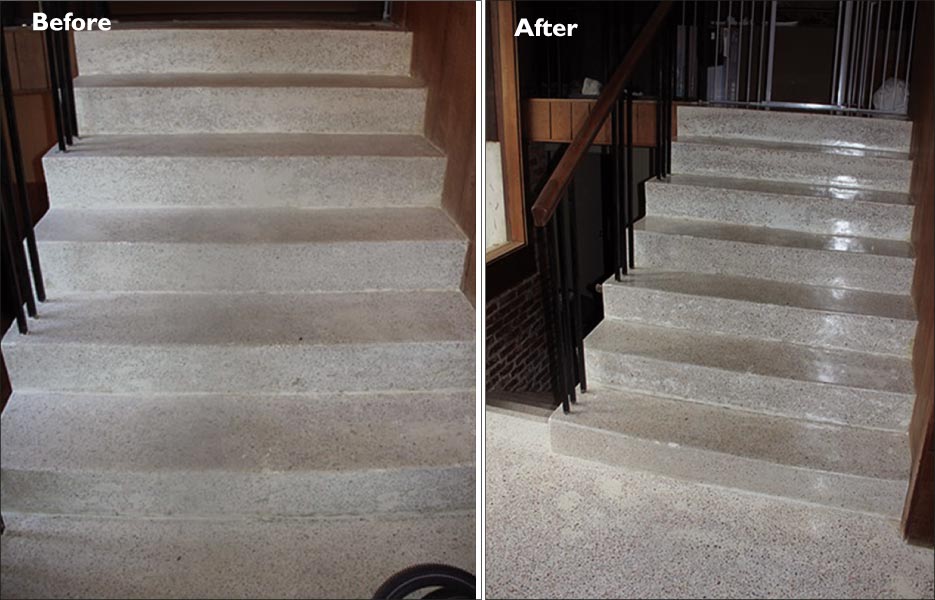
There were also two sets of stairs that were an even bigger nightmare, as evidenced by the pictures. Not only were the stairs gouged and waved, some acid had been spilled and had eroded several of the treads, almost beyond repair.
Also, the gouging from a grinder and cup wheel was very evident around most all of the border edges. This of course meant that every wall edge had to be ground and honed to blend with the rest of the floor. As we all know, edge work is back-breaking but is essential in many projects to achieve the best overall results. Who wants an ugly inch and half picture frame around the room? At least the baseboards had been removed, which made for easier access.
After consulting with the customer to manage their expectations regarding the costs and expected results, the next task was to actually calculate the required course of action. As every contractor knows, you always have to plan for the worst and be ready to implement your contingency plan, if required. The rule of thumb is, if it can go wrong, it probably will! Specifically, if you have ever tried to feather and blend divots and gouges, you know exactly what I am talking about.
The client wanted the floor to have color, clarity, and shine. Of course they wanted this ugly caterpillar to be turned into a beautiful butterfly. A natural polish was discussed as the best long-term solution for the floor. This meant that the floor would have to be rectified as best as possible, and then honed and finally polished.
So to begin with, the large scratches around the border edges, gouges, and divots had to be first hit with a hand tool as a floor machine would simply ride over and miss these below-surface issues. If you tried to grind the surrounding area down to the lowest level of the divots, you would be dangerously near the concrete substrate. A flexible metal bond was the only diamond capable of helping these issues. 50g, 120g, and 220g flexible metals were used, based on the need. After smoothing of the scratches around the borders and in the divots, resins would be required to bring the level of hone up to prepare for polishing.
So in general, the entire floor was ground starting with 50g resins, as scratching was prevalent throughout. Typically, you should be able to start around 220g, but the condition of this terrazzo floor was anything but typical, by any standards. After grinding and honing the deep scratches, divots, and gouges using the hand tool, the 50g resins were implemented. These first-step resins were actually ceramic transition pucks, which are much more aggressive than standard phenolic or epoxy resins.
This foundational step was the most important, as the first step usually is.
 |
|
The poured terrazzo stairs were also in pretty rough shape, including acid staining and wear. The client wanted to restore clarity, color and shine. |
My favorite old saying is, “It is very hard to make up at the end for what you did not correctly do in the beginning, and it is certainly not very efficient.”
To make it even more difficult and time-consuming, each step of the borders and divots were done before each step with the floor machine. Always overlapping the floor machine to hand tool work helps to blend floors so that these areas do not stand out. Finishing with a hand tool at the end will most assuredly make for a noticeable picture frame or irregularities in the floor.
So, once the borders had been cut in and the deep scratches, gouges, and divots had been blended as best as possible, the 50g ceramic transitions were implemented. Then the 120g resins were run on the hand tool around the borders and in the divots before running the 120g resins on the floor machine. This action was repeated with the 220g and 400g resins up through 800g.
Once the floor was properly honed, or at least thought to be properly honed, Majestic Marble Polishing Compound was used to achieve the final gloss.
Of course, any missed scratches or blemishes really show up after polishing. So at this point it was necessary to take a hand tool back to repair and blend any of these eyesores, and then re-polish again with the floor machine. Unfortunately, there were so many of these bad areas that it was a whole evolution before the entire floor was polished for a second time. Remember the contingency plan I mentioned earlier?
The stairs were another problem entirely. They were so scratched and marred by gouges, divots, and areas where acid had been spilled that an entirely different plan of action was decided upon.
The stairs were ground using 50g, 120g, and 220g metals to rectify and hone as best possible. However, due to the deep acid etching, which looked like erosion, it was decided that a durable solvent based acrylic topical should be used to not only protect and give some gloss, but to help consolidate these badly eroded areas as well. It was more than likely that these badly eroded areas would continue to erode quickly unless they were filled and covered. Two applications of the acrylic topical solution were applied over a 24-hour period.
Finally, the entire floor was mopped with a solution of Majestic pH Neutral Cleaner, allowed to dry, and then buffed out the door, using a white pad.
 |
|
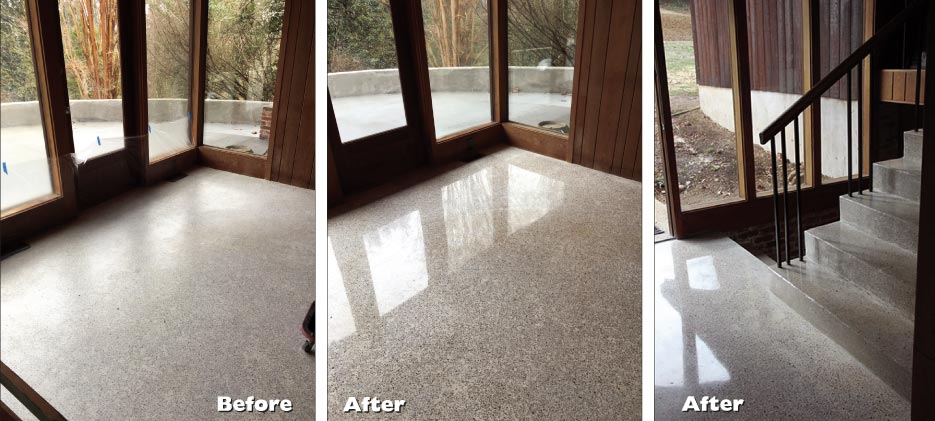
Always consult with the customer to manage their expectations of what can be done, and the results you expect to achieve. |
After all was said and done, the entire project actually turned out pretty good. The client was ecstatic and very pleased with the results. As professionals, we sometimes tend to over-analyze and can therefore be much more critical in many situations like this, than is necessary. However, it is usually more prudent to be over-critical than under-critical. If I do say so myself, this ugly duckling project almost turned into a swan.
As always, consult with your distributor for quality products and advice to help make your projects as successful and efficient as possible.
Bob Murrell has worked in the natural stone industry for over 40 years and is well known for his expertise in natural stone, tile and decorative concrete restoration and maintenance. He helped develop some of the main products and processes which revolutionized the industry, and is currently the Director of Operations for M3 Technologies.