Stretch Your Boundaries
Ben Cole
Stone Industry Consultant
Photos provided by Cole Brothers
 This past spring brought a slew of interesting and challenging projects for my company to work on. Two of my favorite projects involved the use of engineered stone and using it in ways we never had before.
 I don’t know about you, but challenging projects and using stone in new ways is something I love doing to break up the monotony of standard kitchens and really show what our company is capable of producing. It is also something that you and your team can feel proud about, knowing that you are stretching your fabrication boundaries.
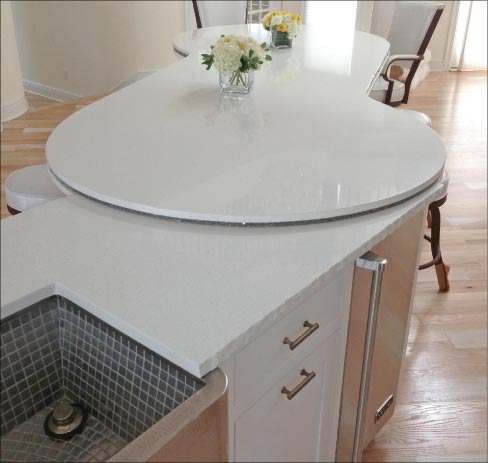
 The first project I would like to present involved using Zodiac Cloud White quartz. The designer had specified using 3cm Zodiac for the perimeter and one section of the island to be finished with a chiseled edge. At that time, we had yet to put a chiseled finish on engineered quartz and I told the the designer that I would need to try a sample piece to make sure that the chiseling did not present an issue. After experimenting with a sample, we found that the chiseling actually worked very well on the Zodiac and looked great.
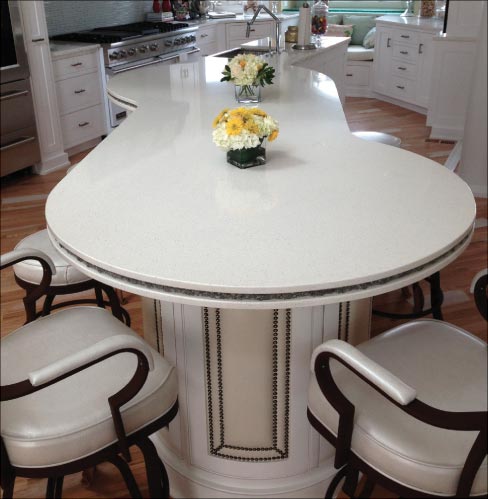
 The second twist to this project was that there was a large section of the island that connected to the single-layered chiseled section. For the second part of the island the designer wanted to use the same Zodiac Cloud White, except this area would use 2cm Cloud White on the top and bottom and in the center it would sandwich a 2cm layer of Cambria Minera (total thickness of the piece was 6cm).
The top and bottom layers were to be finished with an 1/8 inch round over and the middle layer was to step back 3/8 inch and be finished with a chiseled edge. It was essentially to look like a reverse Oreo cookie (white layer on top and bottom with a dark layer sitting slightly back in the middle). This section of the island was shaped like the number 8. One of the trickier parts of this was that the three-layered 6cm island was to join the single layered chiseled 3cm section.
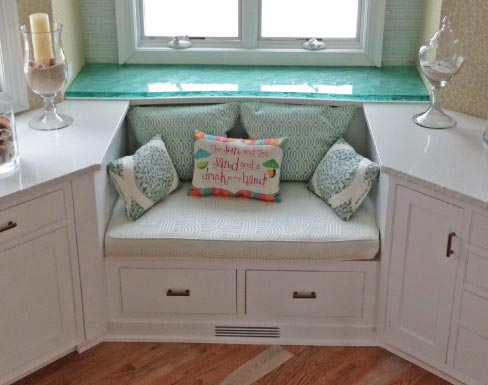
The final twist on this project was that the designer wanted us to provide a fancy piece of tempered glass that sat on top of the Zodiac in one section (nook / bay window) of the perimeter top. Now, I have worked with a glass manufacturer out of Canada that can make some really spectacular pieces to a specified shape from measurements we send them. However, I was not in love with the idea of the glass sitting directly on top of the engineered stone.
In order to help provide some cushion, we researched and found a clear plastic mesh that we were able to put under the glass. And because the glass was between two walls we were able to use clear caulk on the back and sides to help give some type of glue / bond to the glass and the surrounding area to lock it in place, for additional stability.
This may have even been unnecessary as the only way the glass would ever move is if someone was to attach a suction cup and try to pull it out.
When the designer had first brought up the ideas of the chiseled edge and a triple stacked section of island with the Oreo layout, I was skeptical of the design. When he pushed the boundaries even further by using a piece of glass sitting directly on top of the engineered stone in one section of the kitchen, I thought he was outright crazy.
But to the designer’s credit, everything came together spectacularly well and the kitchen looked like it belonged on a cover of a magazine. And in the process I was able to experiment and learn a few new things, especially the handy application of being able to chisel the engineered stone.
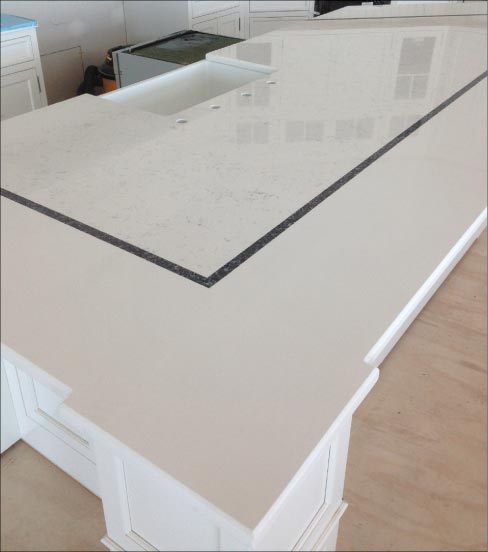
In my second favorite project of the spring, we worked on a twelve foot long island. Now, what was special about this island was that the designer wanted to avoid having a main seam in the top. And as you are likely aware, most slabs, especially engineered quartz slabs, do not come in twelve foot lengths.
So what the designer asked us to do was to use one color of Q quartz (Fairy White) for the main center chunk of the island. This main center chunk (roughly 40 x 117 inches) was then to have an accent strip of gray Quartz (Cambria) that measured roughly 1-1/4 inches wide to surround the main chunk on one long and two short sides. The island was then to have a different color of Q quartz (roughly 12 inches wide) to surround the accent strip (on one long and two short sides).
The challenging part of this project for my team was that we knew we would need to polish the face of the entire piece on our radial arm machine if we were to make the transition between the three different colors feel perfectly smooth.
Now, we had polished the face of quartz before and knew that it was possible, but polishing in two different colors of Q quartz and a different brand of quartz in the border was something that we were not sure could be done.
So we took the smart approach and made a mock-up piece, which we polished to ensure that there would be no issues. The trial piece polishing went well, and luckily, there were no hidden problems and we were able to polish the entire face of the island, and presented a perfect finished product.
The last tricky step of this was boom lifting this piece up to the second floor of the house and flipping the piece up onto the cabinetry without having any of the pieces shift or come loose. But from experience, we knew that the engineered stones bond even stronger than the natural stones when glued together with acrylic adhesives or epoxies and the likelihood of the pieces coming loose was very small.
So as expected, the island was installed without a hitch and the designer and homeowner were extremely happy with the finished product.
In my opinion, it is important to be honest and upfront with a designer or homeowner when you are doing something out of the ordinary, or something that you have never done before. Let them know that a sample may need to be made or tested to ensure that what they want is possible.
In some cases, what they want may not be possible or pose too much risk at some point in the process (fabrication or installation). But above all, enjoy the process of stepping out of the normal confines of what you do and showing what you and your team are capable of accomplishing.
Ben Cole grew up in the stone industry working in his family’s shop and currently manages a family-owned fabrication shop in southern New Jersey.